Free Animal Training video series

82%

Do you want to successfully modify the behavior of animals in your care?
Do you want to help train your or a client’s dog, cat, horse, pet goldfish or any other species?
Maybe you work in a captive animal institution with lions, giraffes, and elephants?

If so then this free series of animal training videos is for you.

The principles I use are based on Behavioural Science and Applied Behavior Analysis:

* Behavior is a result of past consequences.
* Animals are always either moving towards the things they want or away from the things they don’t.
* It’s my goal to spread the word about the most positive and less intrusive methods of Animal Training known.

I’ve been working in the Animal Training Business now for over a decade. I’ve worked in America, Canada, Australia and New Zealand. I’ve worked with some of the best animal trainers in the world. I’ve also worked for some of the largest Animal Training Businesses. I’ve set up complete new Live Animal Shows. I’ve run zoo-wide training initiatives. I’ve worked with pet owners and their animals. Additionally, I have articles published in industry magazines. Last but not least I run my own Animal Training business.

My mission at Animal Training Academy is to empower you to make a difference.
Get started today with your free video training series:


Lesson 1 – The Secret about Feng Shui and Animal Training.

This video is about Feng Shui and Animal Training. You have probably heard of this term in relation to interior design. It often refers to how you might set up one of your living/working spaces. But have you heard about it with relation to Animal Training?

Feng Shui is a Chinese philosophy that promotes setting up your environment in a way that promotes its use. It’s believed that by proper environmental arrangement you can make spaces more comfortable. Feng Shui is also said to improve physical and mental health. Relationships are additionally believed to improve with good Feng Shui. Ultimately by improving all of the above, this helps lead to success. How can we therefore implement these principles with your Animal Training?

Feng Shui is important when setting up your animals environments. You should endeavor to set Animals environments up in a way that makes desirable behaviors easier to perform. Furthermore we need to make desirable behaviors more reinforcing than undesirable behaviors.

We make it easier for our animals to do what we want. We pair correct behavior with positive reinforcement. This combination helps us empower our Animals in a positive way. In my experience, this is one of the most robust methods to achieve success. Correct environment arrangement and positive reinforcement Animal Training augment high animal welfare.

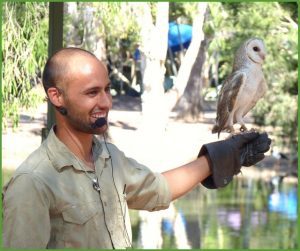
Watch the video (top of the screen) to learn more about Feng Shui and Animal Training. The Video has an example of good and bad Feng Shui in action with Molly the Morepork.

The first thing you should do before any training project is examine your environmental arrangement. Ensure that your animal can move freely within the environment. Make sure that there’s nothing unsafe in the environment. Make sure that the behaviour you are asking for is able to be performed easily. Check for unstable surfaces. Make sure there is enough freedom for movement. You and your animal should be able to move freely in the training space.

Once you have good Feng Shui You are ready to start your training.

Lesson 2 – Creativity works for me! It can work for you, too!

Animal Behaviour is the study of one. Each animal is an individual. And they all have different learning histories. Consequently, each animal also has its own unique set of reinforcers.

So, what is reinforcing for one animal. might not be reinforcing for another. Likewise, a Training plan that works for Animal A, might not work for Animal B. This requires us to sometimes be creative when working with animal behaviour.

An Animal Training secret that gets results.

I believe that one trait of a successful animal trainer is creativity. This refers to creatively solving your training challenges. Maybe you are stuck as to how to become more creative?

This is what I have found has worked for me. I consistently ask myself one question that repeatedly delivers results. “If there was something I could do. No matter how small or insignificant that something might be. What would it be?” When you ask yourself a question like this something happens.  Your brain will eventually provide you with an answer. Then all you have to do is take action on that answer.

Do you sometimes experience challenges with achieving nice animal behaviour and training results? Try asking yourself the above question. Be creative and you might surprise yourself. Also, remember that all animals are individuals. What worked for one animal might not work for another.

I was reminded of the individuality of every animal, when I endeavoured to train two parrots to do the exact same behaviour. Watch this lesson’s video (above). Learn how I accepted the individuality of each animal. Learn how using creativity I managed to get results from both birds. I did this via completely different teaching strategies.

Lesson 3 – How to Measure Animal Behaviour.

“If you can’t measure it then you can’t manage it”

This is true in business and when Training Animals. Measuring behaviour when Training Animals is a concept many people initially struggle with. To make it easier to understand it’s beneficial to examine how we as humans communicate to each other. When talking about Animal Training it’s highly beneficial to develop a common language.

I generally encourage not using labels when training animals (e.g. Happy, Angry, Sad, Aggressive). Instead of using labels I suggest describing what you can see and hear your animal doing. For Example, rather then saying the dog was happy. Or the dog was excited. Or the dog was aggressive. We could say, the dog ran up to me. Tail wagging. Ears up and forward facing. And tongue hanging out to the left of his mouth. By eliminating labels we also eliminate differences between people’s opinions on behaviour.

People can disagree wether an animal is happy or sad. People can not disagree however that the bird has dilated pupils, raised feathers and is leaning to the left.

How you can improve your success, with one small technique.

There are three labels I use when working with behaviour. These three labels are Desirable, Undesirable and Acceptable.

We start of by defining what specific behaviours look like. We describe the behaviour in relation to what we can see and hear. For example, one of the behaviours in this lesson’s video is “standing up and huffing/hissing. “ Then we can assign individual behaviours to one of the three labels categories.

Let’s use the “standing up and huffing/hissing” behaviour as an Example. In the video we decided as a team that this behaviour was “Undesirable.” This technique works well in a team environment. Each individual animal ends up with a list of behaviours. Each behaviour falls into one of these three categories. We then measure behaviour by the frequency it occurs. As a team we work to maximise desirable behaviours. We work to minimize undesirable ones. This helps us set goals. Measuring behaviour becomes straightforward. Ultimately we are much more easily able to measure our success.

Watch this lesson’s video. With an Australian Brush Tail Possum as an example, you can see how we implemented the above.

Lesson 4 – How to get into Animal Training.

I have had a wonderful career as an Animal Trainer. I have been very blessed to make some amazing connections. I have been inspired by some great people. These experiences have changed the course of my life.

When I was young I had no idea how to get into Animal Training. The people I have met have shown me the way. They have been my teachers. They have been my mentors. I found continual guidance in their wisdom. They aided my development. And they assisted in making me into the trainer I am today.

There is one teacher I will always remember. This teacher stands out above all the rest. If I hadn’t absorbed his wisdom then I believe that I would be only half the trainer I am today. This teacher is not what you might expect. This teacher had a 2 meter wingspan. He also had 750 pounds per square inch of closing pressure in his talons.

This teachers Name was Bob the Wedge Tail Eagle. He was the fist animal I ever trained. The lessons Bob taught me, still guide me today. A significant chunk of everything I currently do stems from his lessons.

I wanted to share Bob’s story with you so I made this video. Maybe it can help you learn about how to get into Animal Training.

Bob the Eagle started me on my Odyssey. However, there were many elements involved in making me a good trainer. I’ve read a lot of books. I’ve been to a lot of conferences. I’ve networked extensively. I’ve studied many courses and qualifications. I’ve travelled internationally to seek out opportunities. This has been my odyssey. Of course if someone asked me “how to get into animal training?” I wouldn’t necessarily say you have to do what I did. Rather I would say forge your own odyssey. Challenge yourself and never stop learning.

If you have completed this lesson then click the button below. This will mark the lesson as complete, so you know for future reference.

Lesson 5 – How to write Animal Training Plans.

4 SIMPLE STEPS TO WRITING YOUR SHAPING PLAN

1) At the bottom of a blank piece of paper write down your final behaviour. This is the behaviour you want your animal to do after your training is finished. (point B)
2) At the top of that same piece of paper write down the closest behaviour the animal already does. That is the closest behaviour it already does  to the final behaviour from step 1. (Point A)
3) Fill in the gaps. Write down small behavioural increments required to get you from Point A to Point B.
4) Implement your training plan. Reinforce each step along the way. Modify the plan as needed. Stop when you reach you final behaviour.

In this lesson we discuss how to write good training plans. Being able to write these plans assist in developing your shaping skills. Shaping being a technique used to train animals. Trainers of all levels are constantly practicing and refining this important skill set. Shaping involves understanding what your animal already does. Then thinking about the new behaviour you want from your animal. This is followed by slowly reinforcing any movement in the right direction. Starting with what the animal already does. Eventually ending up with the new behaviour. Having a plan written down on paper is a good idea. It helps clarify in your mind what you need to do in an individual training session. This is important. Because if you don’t know what your asking from your animal, then how are they meant to know?

NOTE: You don’t have to stick to your plan. If your animal is learning fast, miss a few steps. If your animal is learning slowly, Maybe add a few steps. Always listen to what your animals behaviour is telling you. Adjust your training accordingly. Watch this Lessons video to see how I put this technique into practice with a Red Crowned Parakeet.

Lesson 6 – Clicker Training – How to know when to use a clicker.

Clicker training is a popular way of training. Clickers are useful to mark with precision exactly when your animal has done a desirable behaviour. If used correctly in this fashion they can be highly beneficial. Because of their popularity, clickers are widely available and used in training. Consequently. many people acquire clickers without doing the requisite homework. People start clicking without learning how to properly click. Lacking this understanding the clicker is misused. Part of understanding how to use the clicker also includes understanding “when” to use the clicker. This lesson touches on this subject.

3 times when it could be beneficial to use clicker training.

  1.  When you are having a challenging time marking with precision exactly when your animal has done a desirable behaviour.
  2. When you can’t deliver a reinforcer to your animal immediately after it has done a desirable behaviour.
  3.  When you want to use a sound to mark a correct behaviour and more then one person is going to be training the animal. The reason behind this is that the clicker makes a universal sound. No matter who is using it, it sounds the same. If for example you used a verbal sound instead of the clicker, the sound would change slightly between different people. This could potentially be confusing for the animal involved.

Now, imagine your animal has learnt a specific behaviour and you’re able to consistently deliver a reinforcer immediately after this. It’s possible at this stage that it might be beneficial to remove the clicker from the training. Sometimes this is exactly what I do.

3 Reasons why you might stop using the clicker once the behaviour has been learnt.

  1. Removing the clicker helps free up hands to do other tasks.
  2. The animal in this lessons video was going to be used for educational purposes in a wildlife park. In his eventual role the clicker had to be removed for presentation purposes.
  3. It is its good to practice your skills as a trainer. Removing the clicker once a behaviour has been trained helps you practice your continual communication with your animal. You might find it more challenging once the clicker has been removed (or you might find it easier). Remember even highly experienced trainers are continually practising their training skills.

Remember each animal is an individual. Each training session and situation is unique. Therefore make sure you look at your unique situation and make a decision as to what is best for you and your animal.

Lesson 7 – See how easily you can use Positive Reinforcement.

In this lessons video I am at Natureland Zoo in Nelson, New Zealand, helping to train the Zoo’s Cotton Top Tamarin Monkeys. There are three Cotton Top Tamarins that live there. The Natural habitat of these monkeys is forests in Colombia, South America. Click HERE to learn more about this species and its conservation. The room in the video where the training takes place was relatively new at the time. The room helped mimic natural Tamarin environmental conditions. Inside the room were heaters to help keep the animals warm on colder days.  We decided that we wanted the Monkeys to increase the time they spent inside this new area. Consequently we initiated some training to make that happen. Watch the video below to learn how.

Positive reinforcement

We were using positive reinforcement to teach these animals that if they came into the room good things were going to happen. Positive Reinforcement is when something gets added to the environment after a behaviour occurs. This added stimulus acts to maintain and/or increase the frequency of that behaviour in the future. n this video we add meal worms and grapes into the Tamarins environment. These get added after the Tamarins enter the room. You can see how adding these items contingent on the Tamarins behaviour increase the frequency of:

  1. The Tamarins coming into the room and;
  2. The Tamarins staying in the room.

NOTE: You only see two of the three monkeys in this lessons video. This is a good reminder that all animals are individuals. Whats reinforcing for one animal might not necessarily be reinforcing for another. The Tamarin you don’t see took a while longer to build its confidence. Although you don’t see it in this video, over time he eventually started coming into the room at a higher frequency as well due to the use of positive reinforcement.

Lesson 8 – How to quickly improve your skills – Animal Training Basics.

In this lesson we will discuss some Animal Training Basics. You will learn about an aspect of the environment that could be important when training your animals. In the video for this lesson the movement of the trainers hand communicates to Devey, the Australian Brushtail Possum, that food is on its way. The trainers hand plays the same role as the sound of the click in clicker training.  Start the lesson off by watching the video below.

One method to quickly improve your skills – Animal Training Basics.

Your animals behaviour will be affected by a variety of factors in any one training session. Additionally, most of us can only effectively focus on one thing at a time. Consequently, I suggest videoing your training sessions. This can help identify nuances of behaviour that are sometimes missed. Watching back your training allows you to identify whats important for your animal. It can also help you develop elements of your training, such as your timing. Whenever I am training an animal I always have a Go Pro Camera attached to my head. The great thing about having a go pro is the many accessories that come with it. Wearing the camera on my head frees up my hands and lets me watch my training back from my own point of view. However you don’t need an expensive Go Pro to film your training. The video in this lesson was filmed on my mobile phone!

In this lessons video being able to slow the content down allowed us to analyse Devey’s focus. We utilised this information in future training endeavours, where we used our hand movement as a bridge. It played the same role as the click sound in clicker training. 

Thank you for participating in this lesson, I look forward to seeing you again soon. Ryan Cartlidge, Animal Training Academy.

Lesson 9 – Animal training relationships. (Molly the Morepork, Part 1).

This is the first of five videos about training Molly the Morepork owl. The series will cover building animal training relationships, hand feeding, target training, crate training and training Molly to be used for educational purposes in a zoological setting.

Although this is a bird based in a zoo setting, like all the videos on this site, the basic behavioral principles are applicable to all animals. So if you work in a zoo, great. However, if you’re a veterinarian, a domestic pet owner or something else, what you can learn here will work for you too.

This video demonstrates an important aspect when starting any new training program. This element is building partnerships (relationships with our animals). In the video you can hear me referring to the RECIPE. The RECIPE is an acronym that includes some essential ingredients involved in any good training initiative. These are as follows:

  • R – Reinforcement (positive).
  • E – Environmental arrangement.
  • C – Communication.
  • I – Information (scientific).
  • P – Partnerships.
  • E – Empowerment.

Although this is the first time the RECIPE has been mentioned on this website it will be referred to again. Consequently, make yourself familiar with the above essential training ingredients.

ANIMAL TRAINING RELATIONSHIPS

Developing a good partnership with your animal is essential to building trust and getting success with your training initiatives. Trust is when you can do something like physically restrain an animal for a health check and have that same animal immediately approach you again and interact in a positive way. The reason they do this is because we have a good relationship with them. This relationship is based on an understanding our animal has. This understanding Is that we are the deliverers of predictable and pleasant events. We want our animals to think HEY… here comes that person, something good is about to happen.

Start all your training off on the right step. Spend time building up a partnership (animal training relationship) with your animal by being a constant deliverer of positive reinforcement into it’s environment. Watch this lessons video to learn more.

Lesson 9.1 – Behavior Management. (Molly the Morepork, Part 2)

This is lesson 2 with Molly the Morepork. Like the last lesson, this lesson talks about certain aspects of the RECIPE for successful behavior management of animals in your care. The RECIPE is an acronym standing for the following.

  • R – Reinforcement.
  • E – Environment.
  • C – Communication.
  • I – Information.
  • P – Partnerships
  • E – Empowerment.

This behavior management video series with Molly the Morepork is the first video series ever produced for Animal Training Academy. It is being digitally remastered for the Academy’s first year anniversary. Read on to learn a little bit more about the content for this lesson.

Behavior Management – Choosing with her feet

When training, it’s important to let your animal choose whether or not to participate. We can allow them to make this decision with their feet. I.e. if they don’t want to participate they can choose to move away. If they do want to participate (and be presented with opportunities to earn reinforcement) they can move towards you (or stay stationary, with you moving towards them). In this lessons video you will learn how Molly did just that. She communicated to me when I got too close by choosing to move away. However if Molly stayed stationary I reinforced her with food.

Three things to identify in the early stages of training/behavior management.

  1. You have correctly identified what’s reinforcing for your animal.
  2. You have your reinforcers ready to offer in your training sessions.
  3. You listen to your animals body language and take things at their pace.

If you have achieved the above three things, this will assist with the following areas of your behavior management. Firstly it will help develop your relationships. Your animals will learn that they can control the environment via their behavior. For example your animal can communicate it’s uncomfortable with your proximity, by moving away. Also, if it does the behaviors you want, it will learn that good things happen (i.e. reinforcers get delivered). This practice helps empower your animal, promote high welfare and foster trust.

Lesson 9.2 – Target Training (Molly the Morepork, Part 3)

This is lesson 3 with Molly the Morepork. In this lesson we are going to be talking about target training your animals.

This Target training lesson is part of the first video series ever produced by the animal training academy. It is being digitally remastered for the Academy’s first year anniversary. Read on to learn a little bit more about the content for this lesson.

Target training.

Target training has a large range of different and highly beneficial uses. One of the most common uses is to train your animal to touch its nose to a target stick. You can see an example of this demonstrated in the video for this lesson with T-lo the cat. Having an animal target trained to a stick like this allows you to easily be able to communicate to your animal that you want it to move from location A to location B.

Of course you don’t have to target a nose and you don’t have to use a target stick. For example, it’s common practice in zoos when working with dangerous animals like tigers to get them to target their bums against the mesh of their exhibits. This allows a carer to use positive reinforcement to train acceptance of injections into that area.

In this video you can see how I use my finger to get Molly to bring her entire body over to wherever I am. This is target training as well. I am targeting Molly to my tapping finger. Frequently you might find that your animals are target trained and you don’t even know it. For example if you do training with your animal and always feed it out of your hand. You might find that if you close your hand into a fist your animal will follow it around. This means that your animal is targeting to your hand.

Enjoy this lessons video content below and good luck with all your training endeavors.

Lesson 9.3 – Crate training tips (Molly the Morepork, Part 4)

This video is part of a series of videos that are being digitally remastered for Animal Training Academy’s first Birthday. The Molly the Morepork training series is the first video series ever produced by Animal Training Academy and this video is part A of a two-part lesson providing some crate training tips that can be applied to all animals.

In the video, I am using food to positively reinforce Molly for entering the crate. Although it’s not the only reinforcer I am using in the early stages of the training. I also want Molly to know that she can leave whenever she wants. To help me achieve this you will see I do a couple of things. Firstly I set the crate up so that only half of it is covered. Secondly I leave the door of the crate off when first starting. This allows Molly the opportunity to leave quickly and easily.

Crate Training Tips.

  • In the early stages of training allow your animal the opportunity to leave when they desire.
  • Use positive reinforcement to teach them that being in the crate is a desirable place to be.
  • Pretty soon after employing these crate training tips they won’t want to leave.

In this video, we talk about primary reinforcers. Primary reinforcers are things that are generally universally desired by all animals. Some examples of primary reinforcers include food, water, shelter, warmth, reproduction opportunities and safety. This is in comparison to secondary reinforcers, which are previously neutral stimuli that after being continuously paired with primary reinforcers have taken on their reinforcing value.

To learn more about primary and secondary reinforcers listen to one of my podcasts HERE.

I hope you have enjoyed these crate training tips and good luck with all your animal training endeavors. Also please leave a comment below and tell me what you thought of this lesson.

Lesson 9.4 – Owl training (Molly the Morepork, Part 5)

Short windows of opportunity (owl training)

In this video I discuss using short windows of opportunity. The utilisation of short windows of opportunity has been a crucial ingredient in the success of many of my training endeavors. In this lesson you can see how I employ short windows of opportunity in owl training.

This is the basic method I would use when employing short windows of opportunity in my training.

  1. Ask for a behaviour from my animal
  2. Give my animal 3 seconds to behave.
  3. If animal behaves desirably then offer reinforcement.
  4. If animal doesn’t behave or behaves undesirably then pause for three seconds.
  5. After a three second pause present my animal with another opportunity to behave and repeat above steps.

I normally give my animal three attempts at behaving. If after three attempts I don’t get the behavior I was aiming for then I normally take a time out.

(Note: General rule of thumb, each situation is unique and sometimes this necessitates a different approach. Also in early stages of training I give much longer opportunities to offer behavior, but generally try to shorten them nice and quick).

If I think the animal might be successful if presented with another opportunity I will wait 30 seconds and then re-engage in the training employing the above method. If I however think that maybe the animal doesn’t have a high probability of doing the desirable behavior I will pause for a little bit longer. If this is the case I have a few options. For example.

  • Take some steps back in my training plan to a behavior my animal knows and has a strong history of reinforcement with.
  • Examine the environment and see if I can make the right behavior easier to perform.
  • Leave the training until a later time in the day.
  • Sit down and brainstorm other ideas.

I hope you have enjoyed this quick little video on owl training. There is one more video in this series and it’s about the final stage of Molly’s training where we get her ready to free fly in an education show.

Lesson 9.5 – Animal Training Skills (Molly the Morepork, Part 6)

This is the final of a 6 part series on Training Molly the Morepork owl. The series follows Molly’s journey from a three-month-old owl that wouldn’t let me come near her to a bird that’s now used in live animal shows.

In this lesson I want to talk about patience. Patience is really important in your toolbox when it comes to building your animal training skills. I’ve had people tell me that Positive Reinforcement doesn’t work. My understanding of this was that their animal did not learn a behavior in a time-frame, which was, determined by them (i.e. the human). The conclusion drawn was that positive reinforcement was not an efficient training tool.

Some of you might have seen my video about the first animal I ever trained: Bob the wedge tail eagle. The initial behavior I set out to train with Bob took me eight months to achieve. One reason behind this is that Bob and I were learning together. Bob had no schedule in the training.

Bob’s only schedule was going about his day doing the most reinforcing thing available to him at any point in time. It was my job to communicate to Bob what my schedule was. It took me eight months to do this and make that a mutually beneficial schedule, but we got there in the end using positive and un-intrusive techniques.

If you’re new to training practice patience. It’s okay if you don’t get the behavior as fast as you originally thought you might. Keep practicing and as importantly allow your animal to have lots of practice as well. The more practice the both of you have the more you will learn. To help develop you animal training skills be patient not only in individual training sessions but also with your animals learning pace (and your own).

Lesson 10 – Competing Reinforcers – Does your dog come when called?

A reinforcer is anything that immediately follows a behaviour and serves to maintain and/or increase the frequency of that behaviour in the future. At any one time, there are generally numerous reinforcers available within your animal’s environment. Often when we are training our animals, we (and the reinforcers we offer) are the most reinforcing thing. Consequently our animals come over and participate in our training sessions. However as any good trainer knows, the value of what we have to offer can change between environments, over time and with scarcity/availability.

Competing reinforcers

Animals always orientate towards the most reinforcing thing in their environment. Competing reinforcers are different stimuli in our animal’s environments that have reinforcing value. As you can see in this lessons video (below), the most reinforcing thing is not always us. This is something that dog owners frequently report experiencing. Some dog owners find that when they are at home with their dogs, their dogs perform a variety of behaviors consistently and on cue. However the dogs behaviour changes when they leave the house and go to the dog park. One major difference between the dog park and home is the different reinforcers available (for example unique smells and other dogs at the park). In this lessons video you can see that taking training outside with T-lo the cat suddenly means that there are bugs to chase. The change in environment offers different reinforcers and consequently the value of what I have to offer is decreased.

Reinforcement is anything that immediately follows a behaviour and serves to maintain and/or increase the frequency of that behaviour in the future. By developing a thorough understanding of the meaning of reinforcement (and competing reinforcers) you can understand your animals behaviour a little bit better. Your animal is not being naughty or bad when they don’t do what you want, they are just doing the most reinforcing thing available to them. This knowledge challenges you to examine your animals environments, making the right behaviors easier to perform and more reinforcing then the wrong behaviors.